The most common 3D printing mistakes — and how to avoid them
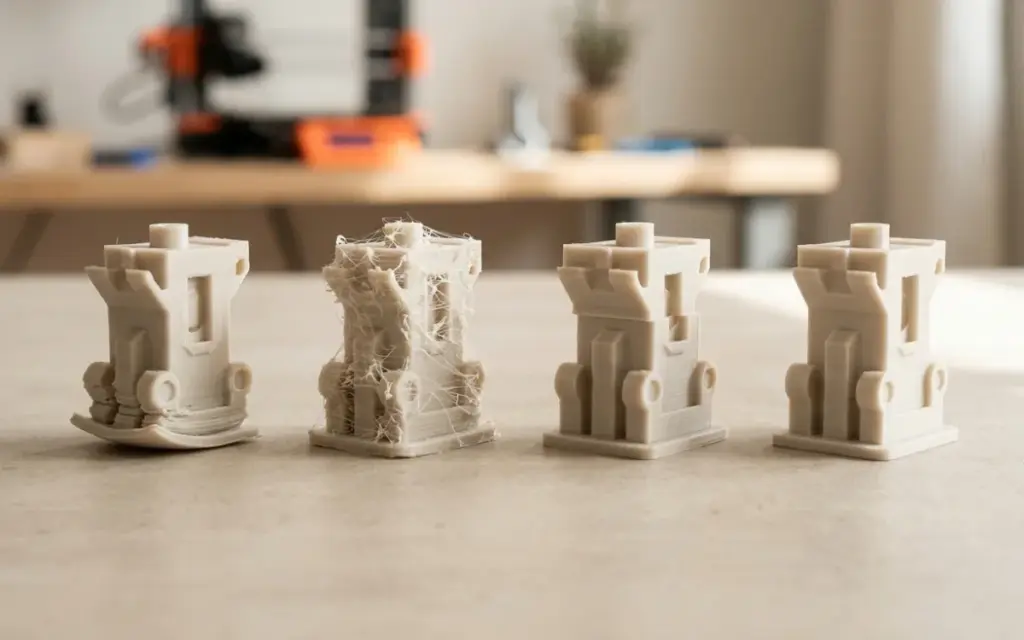
8 3D printing mistakes and how to fix them
Even with experience, things sometimes go wrong: a part comes unstuck from the bed, layers shift, threads stretch between walls. Over the years we’ve run into every one of these problems and know how to solve them. Below are the eight most common FDM printing defects, with specific advice.
Printing yourself, or wondering whether to buy a printer instead of ordering prints? This article will be useful either way.
1. Warping — corners lifting off the bed
What it looks like
The corners of the part lift off the platform and the model bends. Most often on large flat parts.
The cause
Plastic shrinks unevenly as it cools. The lower layers cool faster than the upper ones, creating stresses. ABS and nylon are the most problematic materials in this respect. Warping is rare with PLA and occasional with PETG on large parts.
What we do
- Heat the bed: 60°C for PLA, 80°C for PETG, 90–110°C for ABS.
- Glue stick or adhesive spray on the platform — it works better than any “home remedies”.
- A 5–8 mm brim — increases the contact area with the surface.
- For ABS, an enclosed printer is a must, with no draughts.
2. Stringing — threads between features
What it looks like
Thin strands of plastic stretch between parts of the model. The part looks messy.
The cause
Molten plastic oozes from the nozzle while the head travels. The main culprits are insufficient retraction or too high a temperature.
What we do
- Retraction: 4–6 mm distance at 40–60 mm/s for Bowden; 1–2 mm for Direct Drive.
- Lower the nozzle temperature by 5–10°C — less runny plastic strings less.
- Increase travel speed to 150–200 mm/s.
- Remove minor strings with a heat gun or during post-processing.
3. Layer shifting
What it looks like
Layers shift horizontally. The part looks as if it was cut and glued back together out of line.
The cause
A mechanical problem: loose belts, overheating stepper motors, too high a speed or the nozzle catching on the part. We’ve seen this problem more often on budget Creality printers — their belts stretch after a few months of heavy printing.
What we do
- Check the tension of the X and Y belts — they should be tight like a guitar string, but not overtightened.
- Lower print speed and acceleration.
- Check whether the stepper motors overheat — adjust the driver current if needed.
- Check whether the nozzle catches on printed layers — if so, it may be over-extrusion.
4. The first layer won’t stick
What it looks like
The plastic doesn’t hold to the bed, gathers into blobs, the lines are uneven. The print fails in the first few minutes.
The cause
The wrong gap between nozzle and bed, a dirty platform, too low a bed temperature or too high a first-layer speed. This is beginners’ number one problem.
What we do
- Calibrate the gap between the nozzle and the platform — 0.1–0.2 mm (the thickness of a sheet of paper). On our auto-calibrating printers this happens automatically, but a manual check never hurts.
- Wipe the bed with isopropyl alcohol before every print.
- Print the first layer slowly — 20–25 mm/s.
- Increase the first-layer line width to 120–150%.
5. Elephant’s foot
What it looks like
The first few layers are wider than the rest — the base spreads out. Critical for parts with precise dimensions (enclosures, lids, joints).
The cause
The weight of the upper layers presses on the soft lower ones. Too high a bed temperature or too small a gap between nozzle and platform make it worse.
What we do
- Lower the bed temperature by 5–10°C.
- Check the first-layer calibration — the nozzle mustn’t squash the plastic too much.
- Use “Elephant foot compensation” in the slicer — 0.1–0.2 mm.
- If we design the part ourselves, we add a small chamfer (0.3–0.5 mm) to the base of the model at the STL file preparation stage.
6. Gaps and holes in the top layers
What it looks like
The top surface shows gaps, small holes or sagging. The surface doesn’t look sealed.
The cause
Too few solid top layers, too low an infill percentage or suboptimal wall thickness and infill.
What we do
- Set 5–6 solid top layers (at least 0.8 mm thick).
- At least 20% infill — at 10% the top surface often sags.
- Slow down the top layers for better line bonding.
- Check for under-extrusion (the next point).
7. Under-extrusion and over-extrusion
What it looks like
Under-extrusion: gaps between lines, thin brittle layers, the part breaks easily. Over-extrusion: a lumpy surface, blobs, the part is bigger than specified, the nozzle catches on previous layers.
The cause
Incorrectly calibrated extruder steps (E-steps), the wrong flow rate, a partly clogged nozzle, filament slipping or low-quality plastic with an inconsistent diameter.
What we do
- Calibrate E-steps: command 100 mm of filament and measure how much was actually fed. We do this after every nozzle change.
- Fine-tune the flow rate — usually 95–100%.
- For a clogged nozzle — a “cold pull”.
- Use quality materials with an accurate diameter. Cheap no-name filament is the main cause of inconsistent feeding.
8. Support problems
What it looks like
Supports come off the bed, deform or can’t carry the weight of overhangs. Overhangs sag, and the surface above the supports is uneven.
The cause
The wrong support type or density, too big a gap between support and model, poor support adhesion to the bed or the wrong model orientation.
What we do
- Tree supports for organic shapes (figurines, sculptures) — fewer marks, easier to remove.
- A 0.15–0.2 mm gap between support and model for reliable contact.
- 15–20% support density for heavy overhangs.
- Rotate the model in the slicer — the right orientation often matters more than support settings. Sometimes turning a part by 45 degrees is enough to make supports unnecessary.
How to avoid most problems
Most defects come down to a few basics: calibration, temperature, filament quality and model preparation. Here’s what works in practice:
- Calibrate the bed and check the nozzle regularly — not only when something goes wrong.
- After changing settings, print a 20x20x20 mm test cube — it takes 20 minutes but saves hours of failed prints.
- Keep filament dry. We store spools in vacuum bags with silica gel. Damp plastic gives bubbles, stringing and poor layer adhesion.
- Don’t skip STL file preparation — a proper model solves half the problems before printing even starts.
- Record the settings that work for each material — we keep a table of profiles for every spool.
Don’t want to deal with calibration and defects? Send the model to us. The equipment is tuned, the materials are tested, the experience is there — you’ll get a quality part without the hassle.
Order 3D printing
Need quality 3D printing? printing materials. prices. order. Delivery across Ukraine by Nova Poshta.
Don’t want to prepare the file yourself? Send the model as it is — we’ll check it, fix any errors and quote it within an hour.